October 01, 2019
Create a Branded Amazon Store in these 7 Easy Steps
“Most customers begin their online shopping searches on Amazon. 90% of customers are known to compare prices on Amazon of products they wish to buy and have checked on competitive websites.”
Amazon is one of the most popular e-commerce retailers, with more than 100 million users in India. This massive customer base makes it a great platform for sellers to highlight their product USPs and take business to the next level.
While setting up an Amazon seller account can help your business reach the target audience, creating an Amazon Store can further help in enhancing the customer experience.
[caption id="attachment_12760" align="aligncenter" width="500"] Source: Amazon[/caption]
The 7 steps below will provide a guide about creating an Amazon store for your brand -

 Optimizing your product pages is one of the main reasons for success on the Amazon Marketplace. Research states that “Amazon has surpassed Google in product searches.” Well-researched and relevant content by using the correct search terms can help in the creation of successful product ads.

 With Amazon Store Insights, you can have access to a number of e-commerce analytics like daily visitors, number of views, sales, units sold, etc to review the performance of your store.
To know more about building an Amazon store and providing a rich shopping experience for your customers, leave us a message and we’ll get back to you.
 Source: Amazon[/caption]
The 7 steps below will provide a guide about creating an Amazon store for your brand -
1. Professional Seller Account
Due to its popularity and a vast user base, Amazon has become extremely selective about giving approval to sellers on the Marketplace. Security has also been strengthened with documentation requirements and additional verification. These measures eliminate counterfeits and prevent sellers from creating multiple accounts for manipulating rankings - protecting both sellers and customers. You need to provide the following information for setting up a professional seller account - Account Name - This includes the complete address of your business, contact information, type of business, registration, tax identification number, etc. Verify Identity - An individual person would need to be an account owner of Amazon. The details of identification issued by the government, name, personal details and bank account statement will have to be provided. Card Details - Amazon charges a monthly fee of $39.99, for which card details are necessary. Bank Account Information - Provide a bank account number for direct sales profit that gets deposited every 2 weeks.2. Brand Registry
After a Seller Account, doing the Brand Registry is the next important step. Amazon Brand Registry will help you get greater control over product listings and build better content on all product pages. Amazon will also help in removing duplicate sellers who try to infringe on your brand’s trademark. Brand Registry also provides several tools for enhancing your brand and store, like a professional presentation and upgraded advertising and marketing features. This option is not available for resellers. You need to provide information like your brand’s registered name, serial number, countries where the products are manufactured and distributed, product labels, the brand label on a product and product images.3. Create your store’s homepage
After your brand has been registered, log in to the Seller Account and go to Stores > Manage Stores. Then choose a template for designing the homepage. There are 3 different themes to choose from -- Marquee - The design brings out the brand story and acts as a gateway page
- Highlight - For showcasing products and related content
- Product Grid - For displaying a large number of products in your catalogue

4. Build the store pages
Once the homepage layout has been finalized, create the additional pages of the store, featuring the best-selling products, deals, discounts, catalogue categories, etc. Building the store pages on similar lines of the e-commerce website helps recall and builds credibility. Apart from that, ensure to give proper attention to every detail while making the pages. The most important aspect is navigation - customers should be able to easily find what they are looking for. The main target of the store design should be to provide a convenient shopping experience.5. Add content tiles
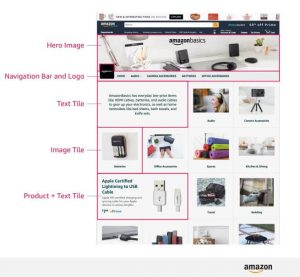
After establishing the page hierarchy, add content titles to all the store pages. With these tiles, you can add images, videos and text to the store. There are 10 sections of content tiles available on Amazon -- Header tile
- Text tiles
- Image tiles
- Image + text tiles
- Video tiles
- Gallery
- Recommended products tile
- Product tiles
- Product grid
- Bestsellers
 Optimizing your product pages is one of the main reasons for success on the Amazon Marketplace. Research states that “Amazon has surpassed Google in product searches.” Well-researched and relevant content by using the correct search terms can help in the creation of successful product ads.
6. Upload products
The next step is to add products to the store. Every store has a product inventory where buyers choose their preferences from a wide collection. The entire product inventory can be uploaded at once if your products are assigned with a UPC or ASIN (Amazon Standard Identification Number) code. If you have the products selling on the marketplace already, simply search the ASIN code of the products and add them to the store.
7. Submit the pages for review and get it published
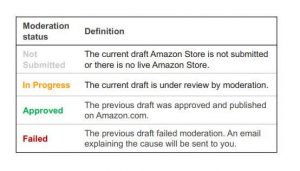
After all the design, content and products uploads have been done, make sure to review the pages to omit any mistakes that may have been overlooked. The Store Preview option helps you check what the store will look like. Check for spelling errors, grammatical mistakes, inconsistency in images or branding and any issues with product images, content tiles and navigation. Once you submit the store, Amazon will review it. It usually takes up to 72 hours for reviewing a store. Once approved, the store will be live for your customers. With Amazon Store Insights, you can have access to a number of e-commerce analytics like daily visitors, number of views, sales, units sold, etc to review the performance of your store.
To know more about building an Amazon store and providing a rich shopping experience for your customers, leave us a message and we’ll get back to you.


